For problems with an existing device, should I try to fix it or buy a new one? It’s not always easy to figure out the answer to this one. If so, how and where would you go about doing it? This is a task that not everyone can handle on their own, and even fewer can do so consistently. As a result, I was faced with the decision of whether to fix my keyboard or buy a new one. After a series of failed attempts, I came to the conclusion that repairing the Logitech G413 Carbon keyboard myself was possible. After all, what was I going to lose if I didn’t get a new keyboard?
While the Logitech G413 Carbon keyboard has a number of advantages, one major disadvantage is that it is short-lived. Owners of the keyboard, as well as those who looked at it but decided against buying it after reading the reviews, know this going in. If the warranty period is extended even slightly, double-triple pressing of certain keys will become the norm after a few years.

Finally, the warranty expired and I was left with this issue. There are only two viable options. I recommend starting with a new keyboard. The second step is repair, which you can either outsource to professionals or take on as a DIY project.
At 5-6 thousand dollars, the MSI Vigor GK50 Elite was the best option for a full-size mechanical keyboard with backlighting and wired connectivity.
Unfortunately, things didn’t work out for the two of us. Firstly, the blue switches in MSI turned the room into a kind of working mashup after Logitech’s quiet switches (the older generation knows what I mean).
It also didn’t have a USB port on the case, which I was used to; in this case, the main “Enter” had a fuzzy operation, which resulted in one failure for several presses of the button.
When typing, it was extremely inconvenient when sentences were accidentally combined. When writing lengthy paragraphs of text, such as motherboard reviews on the Z690, Z660, and the like, this can be a real pain.
In the end, we have a second keyboard, but it isn’t perfect. As they say, a side view of the same clave. As a result, I was able to leave MSI with no regrets after receiving a refund. However, this did not resolve the issue of organizing the working tool.
The task of selecting a new model in this price range was not an easy one, to be honest. Especially if maintaining the work environment’s silence is still a top priority while also requiring precise “mechanics” is a consideration. When the keyboard overpowers Joey Jordison’s vocals or Randy Rhoads’ unforgettable riffs in Crazy Train, I get a strange feeling.
Logitech G413 is a great choice for me in this regard. For mechanics, it is quiet, pleasant to touch, and comfortable. I didn’t want to change, so I decided to try to fix myself.
Required Tools and Skills
After doing some research on Google and YouTube, we’ve come to the conclusion that the switches around here are “branded” Romer-G and need to be replaced. On aliexpress, a quick search yielded offers to purchase such switches in sets of 10, 30, and 60 pieces. Because I decided to do it all myself, because I had soldering skills at one time.
30 pieces of switches were bought, with a margin, although several were already asked for replacement at once – “I”, “K”, “Y”, “I”, “2” and “8” on the digital block. A set of switches with discounts and coupons cost less than 2,000 rubles. We will talk about economic, and generally expediency, in the final part. A soldering iron was available, as was a desoldering pump, which is extremely helpful in repairs.
Actually, this is all that is needed to repair the Logitech G413 keyboard with your own hands:
- Keyboard
- Screwdriver
- Spare switches
- Soldering iron or hair dryer\
- Desoldering pump
- Solder, flux, tweezers, beer, crackers (better than homemade)
It is desirable that the arms be straighter, although for the sake of modesty I can say to myself that, to a certain extent, I have a handle, and I have not had anything to do with the repair of equipment for a long time.
Let’s Start Repair Process
The first thing to do is to remove all the keys, for which a puller is included with the keyboard. By the way, along with the switches came another puller, which I also needed.
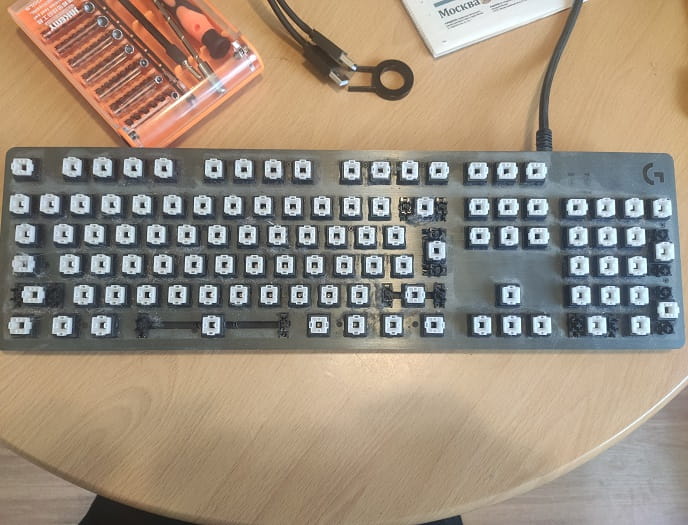
The photo shows that the past couple of years have left marks on / in the keyboard, and it is advisable to get rid of them. Fortunately, with the removed keycaps, it is quite easy to do this. You should only remove them carefully, because they do not impress with reliability and are unlikely to withstand repeated removal and installation back. Their design is somewhat controversial.
After removal, you need to unscrew 27 screws on the front surface and two under the oblong rubber feet on the back side. After that, the case is easily disassembled. It remains to disconnect the cable and start soldering.
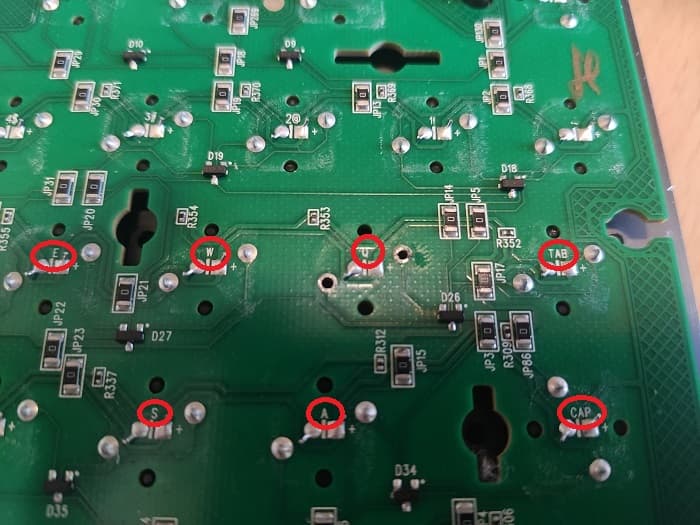
On the printed circuit board, at the locations of the switches, their marking is applied, so it is easy to find the necessary contacts that you need to poke with a soldering iron. The switches have two contacts, and with the help of a desoldering pump they are soldered “once”. After the solder is removed, you can remove the faulty switch.
Before soldering a new one, you need to make some manipulations with it. It must be disassembled (this is done easily, there are latches on both sides). You should only hold the case, because the spring inside can “shoot off” half of the switch.
Switch disassembly is necessary to remove the diffuser installed inside. This model of switches is used on various keyboards, and in this case, the diffuser interferes with the installation, resting on the backlight LED.
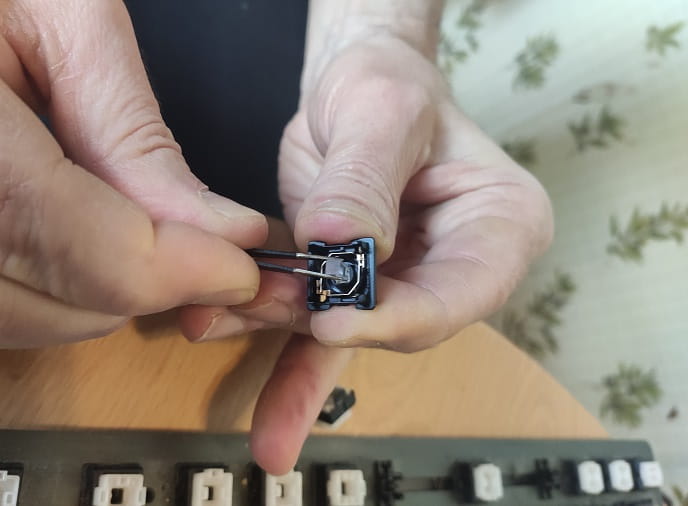
You don’t need to break anything. It is enough to pick it up with tweezers or small pliers, it is easy to shake it in different directions and the diffuser can be easily removed.
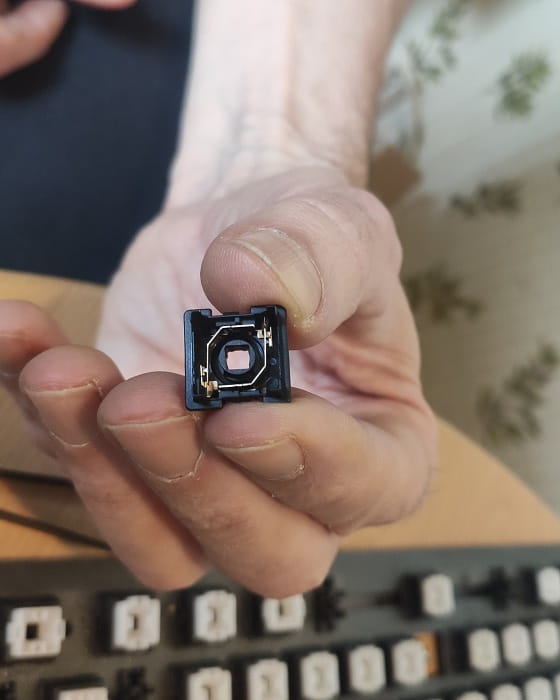
Now you need to assemble the switch, remembering to install the spring, and it is ready to be soldered into the keyboard.
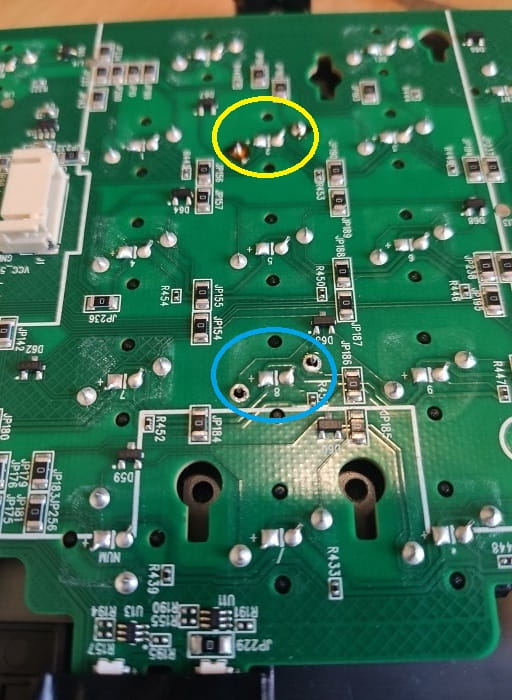
The soldering process itself is elementary. The photo shows the not yet soldered legs of the “8” button of the digital block and the already soldered (flux has not yet been removed) switch of the “2” key.
Similarly, everything is done for each switch requiring replacement. I would say that replacing a few switches takes less time than taking the keyboard apart and then reassembling it.
It must be assembled in the reverse order, and it is desirable that there are no extra screws left. I don’t have any left!
Conclusion
Before I begin my repair, I need to make a reservation that my work only affects switch replacements. My concerns about the stabilizers are unfounded, despite the claims of many other reviewers. In spite of this, careful handling of keycaps is advised as they have a tendency to break due to their two thin legs. But it’s going to be hard to find a replacement.
However, there is an answer. A Romer-G to regular MX keycap adapter is also available on AliExpress. Although I don’t own them, and thus cannot comment on their convenience, they will help to solve the issue of replacing branded buttons with generic ones.
Let us now turn our attention to the repair’s final outcome. There are no more double-clicks on the keyboard. This means that there are no obstacles to resolving this issue at home. Soldering skills of the barest minimum are required. Time will tell whether or not the new switches are “branded” and how long they last, but spare parts are readily available. Passenger flights have been normal for several months now.
As a result of my successful masturbation, I’m grateful for all of these positive aspects of the repair.
There are also drawbacks to this method. First and foremost, the keyboard’s other switches’ durability remains an open question. It’s possible that switch failure will spread like wildfire. Although it’s not difficult to replace them, the process is dreary at the very least. Disassembling and reassembling a keyboard is first and foremost.
To reiterate: Keycaps do not appear to be reliable and are unlikely to withstand as many removal/installation cycles as there are keycaps in existence. If one of them breaks, you’ll have to either find a replacement that works just as well or make the tough decision to buy a new keyboard.
In addition, the Logitech-branded puller was junk. The removal of the keys was unbearable. In the middle of it, it broke. My guess is that I broke it by pressing a little harder. A “leg” breaking was a major setback. It is, however, the new switch-equipped puller that is working without any issues.
In addition, there will be the price of the repair. The cost of a set of 10 switches, excluding discounts, delivery time, soldering, and other labor costs, is approximately 800 rubles. As long as there are multiple switches to be replaced and the repair can be completed “in one sitting,” it’s preferable.
After a year or two, we’ll know if new double-clicks will appear, or if everything thin has been torn and the keyboard will last another year or two after the intervention. Alternatively, it could be earlier.